
What this guide does
Moblin, OBS, or an IRL camera sends RTMP to your Linux server. On every publish attempt, Nginx checks the stream key through an internal HTTP endpoint on 127.0.0.1:8080.
Moblin / OBS → RTMP :1935 → Nginx-RTMP → OBS / further processing
                               │
                               └→ internal key check 127.0.0.1:8080
Contents
- Automatic installation
- 1. Prepare the server
- 2. Create a stream key
- 3. Back up the configuration
- 4. Configure Nginx
- 5. Install the stats page
- 6. Test the configuration
- 7. Lock down the firewall
- 8. Check the ports
- 9. Configure OBS
- 10. Configure Moblin
- 11. Receive the stream
- 12. Test authentication
- 13. Check the logs
- 14. Autostart
- 15. Security overview
Automatic installation of the RTMP server
Video walkthrough: installing RTMP and SRTLA in PuTTY
The video shows both auto-installers in action: first the SRTLA server, then the RTMP server from about minute 2. Real video transmission over both paths was tested successfully afterward.
Open the video on YouTube (4:18 min.)
The second path shown in the video has its own guide: Install an SRTLA server with Docker automatically.
One install command is enough for the setup once you are logged in over SSH. First become root: with sudo -i on Ubuntu, with su - on Debian without sudo. The installer updates the system, installs Nginx with the RTMP module and Fail2Ban, asks for your personal stream key hidden in the console, and sets up the services. The key is not sent to any form on this website. During longer updates and package installs, dots show progress. The detailed output goes to the log /var/log/irl4you-rtmp-install.log, which only root can read. If something fails, the installer names the step and shows the last log lines.
Paste the full install command below into PuTTY or a terminal:
bash -c 'set -Eeuo pipefail; [ "$(id -u)" -eq 0 ] || { printf "Bitte zuerst Root werden: sudo -i oder su -.\n" >&2; exit 1; }; . /etc/os-release; case "$ID:$VERSION_ID" in ubuntu:26.04|debian:13) ;; *) printf "Nur Ubuntu 26.04 oder Debian 13 unterstützt.\n" >&2; exit 1;; esac; export PATH="/usr/local/sbin:/usr/local/bin:/usr/sbin:/usr/bin:/sbin:/bin:$PATH" DEBIAN_FRONTEND=noninteractive; umask 077; log=/var/log/irl4you-rtmp-install.log; : >> "$log"; chmod 0600 "$log"; if ! command -v curl >/dev/null 2>&1 || [ ! -s /etc/ssl/certs/ca-certificates.crt ]; then printf "Downloadwerkzeuge installieren (Details im Protokoll) ...\n"; if { apt-get update && apt-get install -y ca-certificates curl; } >> "$log" 2>&1; then printf "[OK] Downloadwerkzeuge bereit.\n"; else printf "[FEHLER] Downloadwerkzeuge konnten nicht installiert werden.\n" >&2; tail -n 12 "$log" >&2; exit 1; fi; fi; f=$(mktemp); trap "rm -f -- \"$f\"" EXIT; curl -fsSL --retry 3 "https://irl4you.de/downloads/install-rtmp-nginx-v15.sh" -o "$f"; printf "%s %s\n" "132ba610ecdcd85741e7cce9db7e610b952f46a3414b8396f673c328bc079749" "$f" | sha256sum -c -; bash "$f"'Download the installer to review it The checksum in the command makes sure exactly the reviewed version runs.
This is what the automatic installation looks like in the console:
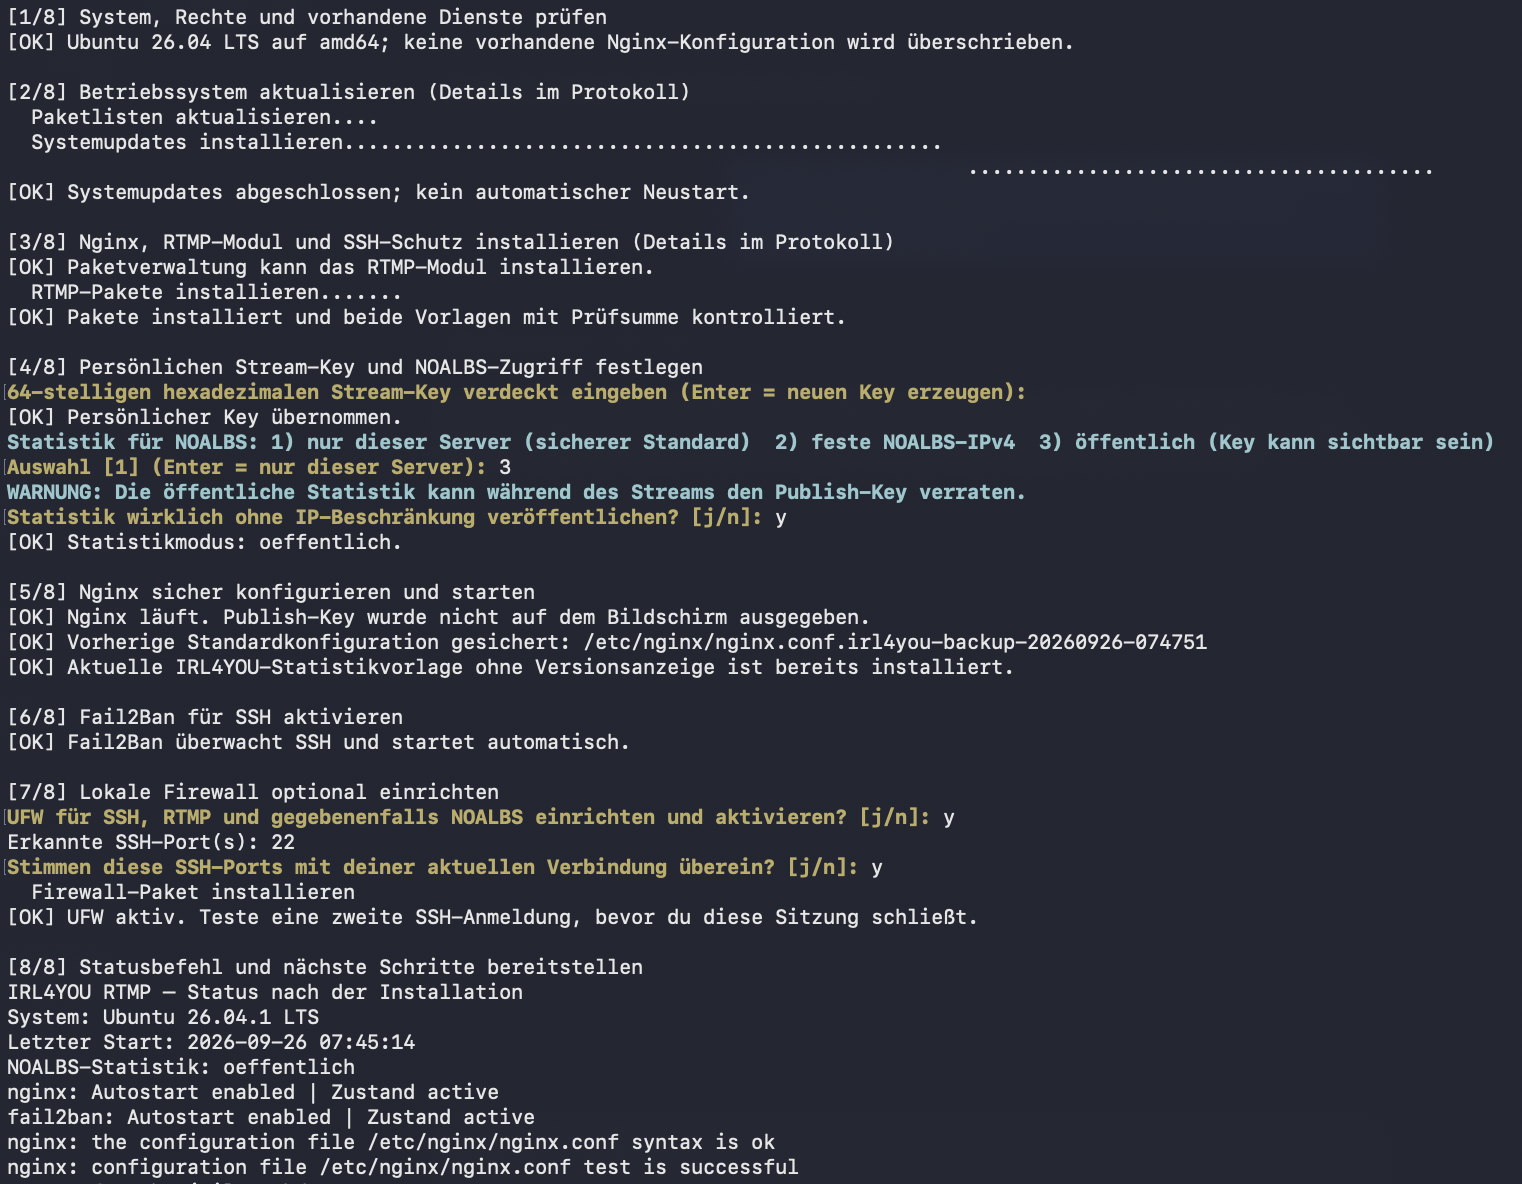
You can enter your own 64-character hex key or press Enter to have a new one generated. A generated key is saved under /root/irl4you-rtmp-stream-key, readable only by root, and is not printed publicly. If the RTMP module is missing on Ubuntu, the installer enables the official universe repository automatically and checks availability again. After that you choose whether the NOALBS stats page should be reachable only locally, from a fixed IPv4 address, or explicitly from anywhere. With the optional UFW setup, the actual SSH port is confirmed before activation. Language and time zone stay unchanged.
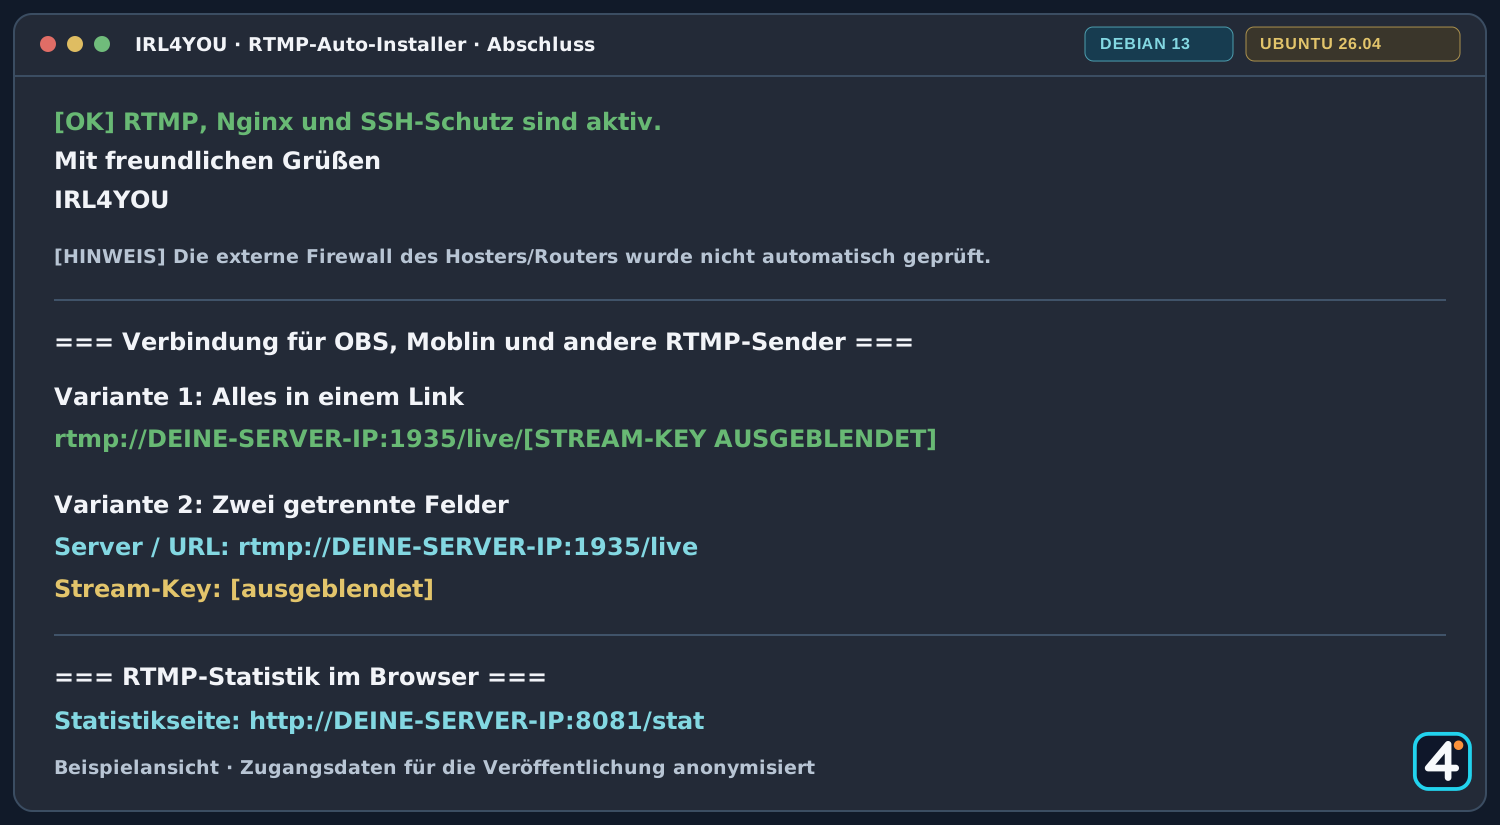
At the end you enter the public server IP or domain and decide whether the secret stream key may be shown once. The output then shows two variants one below the other:
Variant 1: Everything in one link
Full RTMP address: rtmp://DEINE-SERVER-IP:1935/live/YOUR-STREAM-KEYThis variant is for sender apps with a single field for the complete RTMP address, such as IRL Pro.
Variant 2: Server and key separate
Server / URL: rtmp://DEINE-SERVER-IP:1935/live
Stream key:   YOUR-STREAM-KEY
Use this variant when the sender app offers two fields, for example OBS or Moblin. Port 1935 and the path /live belong to this server. /publish/live/ is not used here. Both variants contain the same key. Do not show it in screen captures, and do not publish either the key or the full address. On a server that is already installed, the same current command shows this information again after the status check, without setting up Nginx or the key again.
Opening the stats page after installation
This is what the stats page looks like during a running test stream. Among other things it shows incoming and outgoing bandwidth, active streams, and video data. The graphic shows our own stats template with example values. The stream key has been hidden for publication. Nginx and module versions no longer appear in the HTML view. The note about the automatic refresh every 10 seconds stays.
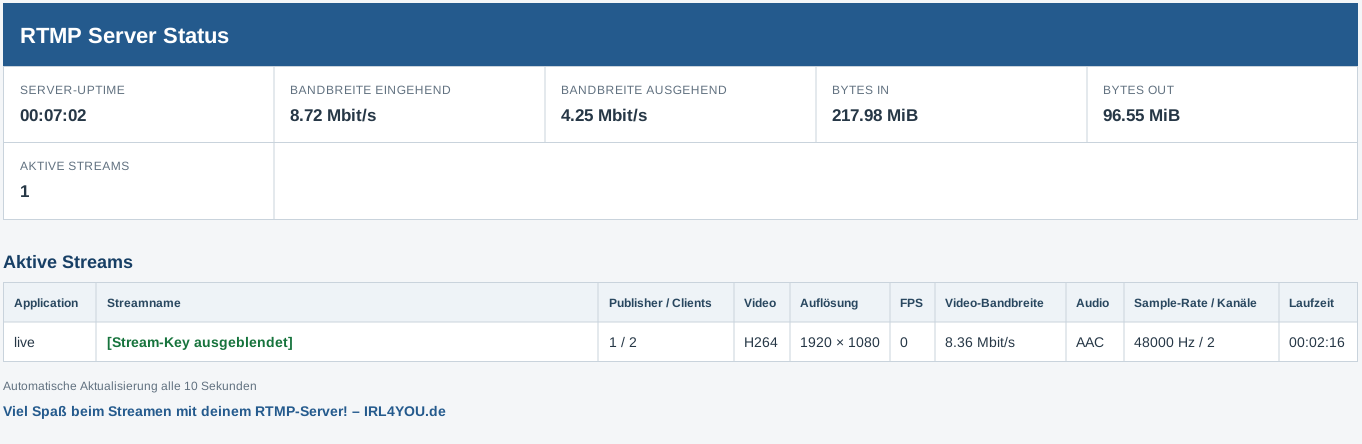
If the RTMP server was already set up with the IRL4YOU installer, running it again checks the status. Only an unmodified IRL4YOU stats template can be updated this way. The stream key and the Nginx configuration stay as they are.
At the end, the auto-installer also prints the matching stats address. If you entered the public server IP or domain, you get the direct link http://DEINE-SERVER-IP:8081/stat when access is allowed for a fixed IP or for everyone. The NOALBS data is at /stat.xml. A link with a placeholder only becomes usable once you put in the real server address.
Set up NOALBS straight from the PuTTY output: The final summary now lists the three values separately: Stats-URL with /stat.xml, Application: live, and Key with your 64-character stream key. If you answer Yes at the key prompt, the real key is there ready to copy. With No it stays hidden in this block too. Under NOALBS: choosing a stream server you will find the matching streamServer fields.
Safe default: If "this server only" is selected, port 8081 stays blocked from outside. You then open the formatted stats page on your own computer through a PuTTY SSH tunnel:
- In PuTTY under Connection → SSH → Tunnels, enter Source port 18081 and Destination 127.0.0.1:8081, click Add, and reopen the SSH connection.
- In the browser on your computer, open
http://127.0.0.1:18081/stat. This link does not work without the tunnel.
If you allowed a fixed NOALBS IP, the direct server link only works from that IP. The SSH tunnel stays an alternative. Do not open port 8081 to the public just for a more convenient view: during a stream, the stats can show the stream key.
The installer stops with an error message if a foreign Nginx is already set up, a checksum does not match, or the configuration fails the Nginx test. A clearly identified IRL4YOU test run that was interrupted after the Nginx setup can be resumed from step 6 without creating the key again. If system updates need a reboot first, it stops before the Nginx setup, and after the reboot you can run the same command again. The installed default Nginx configuration is backed up before it is replaced. After setup you can also check the status after a reboot:
/usr/local/sbin/irl4you-rtmp-statusThe detailed steps below stay as a traceable manual alternative. Afterward, check on your own server the correct key and a wrong one, a real stream from outside, and logging in over SSH again after the firewall is enabled.
1. Prepare the Linux server
Manual alternative: The following steps are for setting things up by hand. If you use the auto-installer, do not run these commands in addition.
The commands work for Ubuntu Server and Debian. For the installation, first switch to a root shell: with sudo -i on Ubuntu, and on a default Debian install without sudo with su - and the root password. If you are already logged in as root, no switch is needed.
Ubuntu: sudo -i
Debian without sudo: su -#. Check every command before pasting it, and use this session only for the server setup. That is why the following Linux commands need no extra sudo.Update the system and install Nginx with the RTMP module, the German language and locale settings, Fail2Ban, and curl. Some data centers ship very slim server images where curl is not preinstalled yet. You will need it later to download stat.xsl directly:
apt update && \
apt upgrade -y && \
apt install nginx libnginx-mod-rtmp locales fail2ban curl openssl -y && \
systemctl enable --now nginx && \
systemctl status nginx
The Nginx status should show active (running).
Enable German language, UTF-8, and locale settings
de_DE.UTF-8 switches the default language and country-specific formats to German (Germany). That includes date, number, currency, and sort formats, for example. UTF-8 makes sure umlauts and special characters are handled correctly.
sed -i '/de_DE.UTF-8/s/^# *//' /etc/locale.gen && \
locale-gen && \
update-locale LANG=de_DE.UTF-8 LANGUAGE=de_DE:de && \
timedatectl set-timezone Europe/Berlin
The new default language applies fully after your next login. You can continue the setup in the existing root shell. Check the stored system locale and the time zone:
localectl status && \
timedatectlLANG=de_DE.UTF-8 and the time zone Europe/Berlin. If you log in again in between, open a root shell again for the remaining installation steps, as described above.Enable Fail2Ban for SSH
Fail2Ban watches failed SSH logins and temporarily bans suspicious IP addresses. The small extra configuration below allows five failed attempts within ten minutes and then bans that address for one hour:
Check the SSH port first. It must match the port number of your working SSH connection. If the output differs or shows several ports, enter the correct port into SSH_PORT yourself. If SSH is started through a systemd socket configuration, also check its listener.
SSH_PORT=$(/usr/sbin/sshd -T | awk '$1 == "port" {print $2; exit}')
printf 'SSH-Port laut sshd: %s\n' "$SSH_PORT"
ss -ltnp | grep -E 'sshd|ssh.socket|systemd'SSH_PORT=2222. Keep the existing SSH session open while you set up the firewall, and then test a second login.tee /etc/fail2ban/jail.d/sshd.local > /dev/null <<EOF
[sshd]
enabled = true
port = $SSH_PORT
maxretry = 5
findtime = 10m
bantime = 1h
EOFNext, enable and start Fail2Ban separately. The last command checks whether the SSH protection was loaded:
systemctl enable fail2ban && \
systemctl restart fail2ban && \
fail2ban-client status sshd
The status output shows, among other things, the number of failed attempts and currently banned IP addresses. Fail2Ban is an extra layer of protection. SSH with key login instead of a password is still the safest option.
2. Create a random stream key
Generate a random 64-character key. Do not use simple values like test, stream, or 12345.
openssl rand -hex 32Example: 8e71c20a29593b84f31ed8c4ae365318bd720490114565168c526f018847162a
/stat.xml is publicly reachable, even your own key can become visible while a stream is running.3. Back up the original configuration
cp /etc/nginx/nginx.conf /etc/nginx/nginx.conf.backupIf needed, restore it like this:
cp /etc/nginx/nginx.conf.backup /etc/nginx/nginx.conf4. Configure Nginx with publish authentication
Download the ready-made nginx.conf
Download the prepared configuration straight from the IRL4YOU server to the right place. The backup you made earlier stays at /etc/nginx/nginx.conf.backup:
curl -fsSL --retry 3 https://irl4you.de/downloads/nginx.conf -o /etc/nginx/nginx.conf && \
chown root:root /etc/nginx/nginx.conf && \
chmod 0600 /etc/nginx/nginx.conf
Then open the downloaded file and replace HIER_DEINEN_STREAM_KEY_EINTRAGEN with the personal stream key you generated earlier:
nano /etc/nginx/nginx.conf
user www-data;
worker_processes 1;
pid /run/nginx.pid;

include /etc/nginx/modules-enabled/*.conf;

events {
    worker_connections 1024;
}

http {
    include /etc/nginx/mime.types;
    default_type application/octet-stream;
    sendfile on;
    keepalive_timeout 65;

    map $arg_name $rtmp_publish_allowed {
        default 0;
        "HIER_DEINEN_STREAM_KEY_EINTRAGEN" 1;
    }

    server {
        listen 127.0.0.1:8080;
        server_name localhost;

        access_log off;
        error_log /var/log/nginx/rtmp-auth-error.log;

        location = /publish-auth {
            if ($rtmp_publish_allowed = 0) {
                return 403;
            }
            return 200;
        }
    }

    server {
        listen 8081;
        server_name _;

        access_log /var/log/nginx/rtmp-stat-access.log;
        error_log /var/log/nginx/rtmp-stat-error.log;

        location = / { return 302 /stat; }

        location = /stat {
            rtmp_stat all;
            rtmp_stat_stylesheet stat.xsl;
            add_header Cache-Control "no-store" always;
        }

        location = /stat.xml {
            rtmp_stat all;
            add_header Cache-Control "no-store" always;
        }

        location = /stat.xsl {
            root /usr/share/nginx/html;
        }
    }
}

rtmp {
    server {
        listen 1935;
        chunk_size 4096;

        application live {
            live on;
            record off;
            notify_method get;
            on_publish http://127.0.0.1:8080/publish-auth;
            allow publish all;
            allow play all;
        }
    }
}
on_publish passes the stream name as the parameter name. The map allows only the key you entered. All other values get 403 Forbidden. worker_processes 1; is essential for this setup: with several workers, publishers, OBS, and the stats page can end up in different processes and not find the active stream.
In Nano, save with Ctrl+O, Enter and exit with Ctrl+X.
5. Install the formatted RTMP status page
The status page shows server uptime, bandwidth, bytes in/out, stream name, publisher, clients, video and audio data, and the stream's running time.
Download the ready-made stat.xsl
Download the file straight from the IRL4YOU server into the intended Nginx directory. That way it is not first saved under /root or copied by hand afterward:
curl -fsSL https://irl4you.de/downloads/stat.xsl -o /usr/share/nginx/html/stat.xsl && \
chown root:www-data /usr/share/nginx/html/stat.xsl && \
chmod 0640 /usr/share/nginx/html/stat.xsl && \
stat -c '%A %U %G %n' /usr/share/nginx/html/stat.xsl && \
nginx -t && \
systemctl restart nginxroot:www-data and 0640? Root stays the owner and protects the file from changes by the web server. The group www-data may read the stylesheet so Nginx can serve it. What you should see is roughly -rw-r----- root www-data /usr/share/nginx/html/stat.xsl. www-data:www-data would not be needed here and would give the web server ownership rights for no reason.Formatted overview: http://DEINE-SERVER-IP:8081/stat
Raw XML data for NOALBS: http://DEINE-SERVER-IP:8081/stat.xml
/stat.xml stays reachable. In this simple variant, port 8081 is public. The stream key can show up there as the stream name and be picked up by third parties. A fixed NOALBS IP or a VPN narrows access without turning the query off.6. Check the configuration and restart Nginx
nginx -tRestart Nginx only if syntax is ok and test is successful appear:
systemctl restart nginx && \
systemctl status nginx
7. Lock down the firewall
SSH_PORT you found above against your running SSH connection and allow it before enabling the firewall. The default OpenSSH rule does not reliably cover a different SSH port.First install just the firewall:
apt install ufw -yThen set the default rules, allow the confirmed SSH port first, and after that RTMP and the status page that NOALBS needs. Enable UFW only after these rules have been created successfully:
test -n "${SSH_PORT:-}" && \
ufw default deny incoming && \
ufw default allow outgoing && \
ufw allow "${SSH_PORT}/tcp" && \
ufw allow 1935/tcp && \
ufw allow 8081/tcp && \
ufw --force enable && \
ufw status verbose&& and \? && runs the next command only if the previous one succeeded. The backslash at the end of a line continues the same command chain on the next line. That keeps the individual steps visible even though they are safely linked. A single ;, by contrast, would carry on even after an error.Do not open port 8080. With this rule, port 8081 is opened to all source addresses at first, so NOALBS can fetch the stats from outside. With a fixed NOALBS endpoint, you can later restrict the rule to its public IP address. After enabling the firewall, check in a second terminal that SSH still works before you close the first connection.
8. Check listeners and bindings
ss -tulpn | grep -E ':1935|:8080|:8081'RTMP may listen on 0.0.0.0:1935. For authentication, 127.0.0.1:8080 must show up explicitly. The status page listens publicly on port 8081.
9. Configure OBS as the sender
Open Settings → Stream and choose the service Custom....
Server:     rtmp://DEINE-SERVER-IP:1935/live
Stream key: YOUR_STREAM_KEY
The full address comes out as rtmp://DEINE-SERVER-IP:1935/live/YOUR_STREAM_KEY.
10. Configure Moblin
In Moblin, create a custom RTMP destination:
RTMP address: rtmp://DEINE-SERVER-IP:1935/live
Stream key:   YOUR_STREAM_KEY
The data path is then: iPhone → Moblin → Linux RTMP server → OBS.
IRL Pro as the sender
If you enter a complete RTMP destination address in one field in IRL Pro, use rtmp://DEINE-SERVER-IP:1935/live/YOUR_STREAM_KEY. Replace the IP and key with your own values. The address contains the secret stream key and does not belong in public screenshots.
11. Receive the stream in OBS
On the receiving PC, add a media source or an FFmpeg-compatible source and use:
rtmp://DEINE-SERVER-IP:1935/live/YOUR_STREAM_KEYFrom there OBS can process the signal further and, for example, send it to Twitch, YouTube, or Kick.
12. Test a correct and a wrong stream key
- Start a test with a deliberately wrong key such as
falscherkey. Publishing must fail. - Repeat the test with your real key. The connection must work.
- Also check that port 8080 is not reachable from the internet.
13. Logs and troubleshooting
When you have connection problems, watch either the Nginx error log or the systemd journal live. Leave each view with Ctrl+C:
Nginx error log
tail -f /var/log/nginx/error.logNginx journal
journalctl -u nginx -fAlso check for typos in the key, the public server IP, the UFW rule, and whether your hosting provider needs to open TCP 1935 in an external firewall as well.
14. Check autostart after a reboot
systemctl enable nginx && \
reboot
The reboot ends the root shell. Log in again over SSH afterward and open a root shell again for the final check:
Use sudo -i or su - again, depending on your system and the user account you set up.
systemctl status nginx && \
ss -tulpn | grep 1935
15. Security overview
| Component | Reachability | Protection |
|---|---|---|
| SSH, confirmed TCP port | Public, if needed | UFW; ideally an SSH key instead of a password |
| RTMP, TCP 1935 | Public | Publish key check via on_publish; only effective as long as the key does not leak through the stats page |
| Auth, TCP 8080 | 127.0.0.1 only | Do not open in UFW |
| Status, TCP 8081 | Reachable for NOALBS | Public at first here and possibly showing the key; narrow it with a fixed NOALBS IP or a VPN |
| Recordings | Disabled | record off; |
Internet
  ├── SSH port → SSH
  ├── TCP 1935 → RTMP → on_publish → key check
  ├── TCP 8081 → stats for NOALBS (may contain the key)
  └── TCP 8080 ✕ blocked
                       └→ internal only: 127.0.0.1:8080
A key nobody else knows initially blocks a stranger's publish attempt. As long as the stats page is public, though, a running stream can give the key away, so do not treat this variant as fully access-protected. Also, allow play all; does not protect playback. For private playback you need play authentication on top, or a separate private transport path.
Leave the root shell after setup
Once all checks are done, switch back to your normal user with this command:
exit