
What this guide does
A smartphone running Moblin or IRL Pro, a BELABOX, or another compatible encoder can send over SRTLA to your Debian or Ubuntu server. The Docker container merges the data streams. OBS then pulls the signal over SRT.
Smartphone / Encoder → SRTLA :8383/UDP → Docker receiver
                                               ├→ SRT playback :8282/UDP → OBS
└→ Stats :8181/TCP → Browser / NOALBSv1.9-amd64 or v1.9-arm64 to match the architecture. The installation was tested on amd64 with Debian 13 and Ubuntu 26.04, and video transmission was then tested in practice. That means the ARM64 variant is not automatically covered. According to the publisher, the image is intended for non-commercial use only under CC BY-NC.Contents
Install your SRTLA server automatically
Current practice video: both auto-installers in action
In 4:18 minutes you see the SRTLA and RTMP installations in the terminal. Video transmission was then tested successfully on both routes. For the complete setup with BELABOX and OBS, the full SRTLA video walkthrough from A to Z stays available further down.
Open the current practice video on YouTube (4:18 min.)
The second installation shown in the video is explained in the RTMP auto-installer guide.
This is for a fresh server with Debian 12/13 or Ubuntu 22.04/24.04/26.04 on amd64 or arm64. Log in over SSH with PuTTY or a terminal and switch to root first: on Ubuntu that is usually sudo -i, and on a minimal Debian install without sudo it is su - with the root password. Then paste the following install command once, in full.
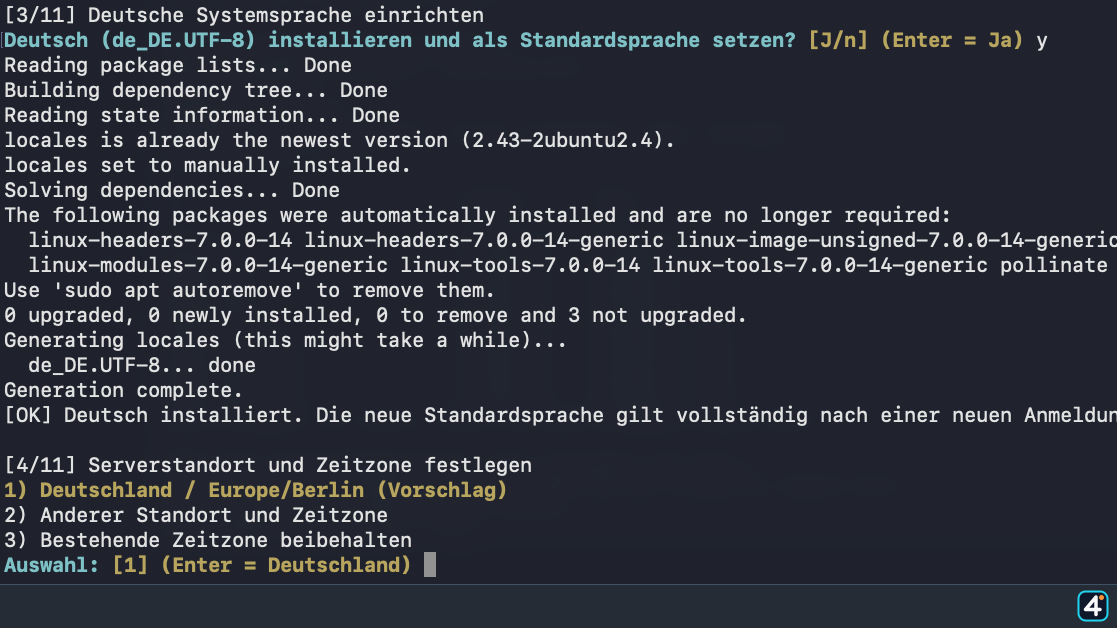
bash -c 'set -Eeuo pipefail; export PATH="/usr/local/sbin:/usr/local/bin:/usr/sbin:/usr/bin:/sbin:/bin:$PATH"; apt-get update; apt-get install -y ca-certificates curl; f=$(mktemp); curl -fsSL --retry 3 -o "$f" "https://irl4you.de/downloads/install-srtla-docker-v2.sh"; printf "%s %s\n" "9c714fed41b5752333ad99b4f186365b4e4953fa3cec4b1d12c8402475fa4f12" "$f" | sha256sum -c -; bash "$f"'The checksum protects you from accidentally running a different version of the file. The installer detects the operating system, picks the right Docker package source and receiver image, and shows its eleven steps one by one. Among other things it asks about updates, German system language, server location/time zone, and the local firewall. Yes/no questions need an explicit j or n. If something fails, it stops with a message, and packages that were already installed are not rolled back automatically. An existing SRTLA configuration is kept.
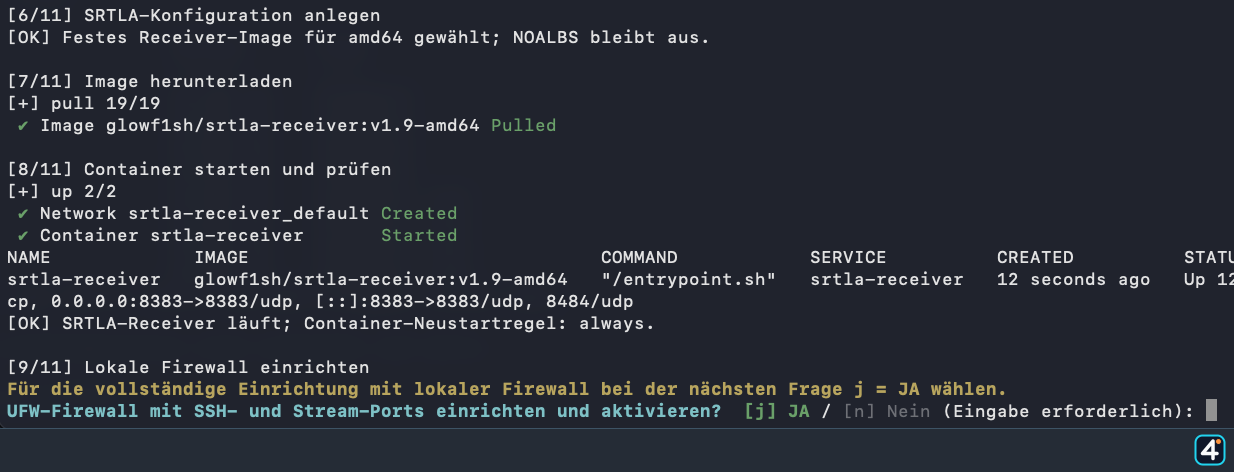
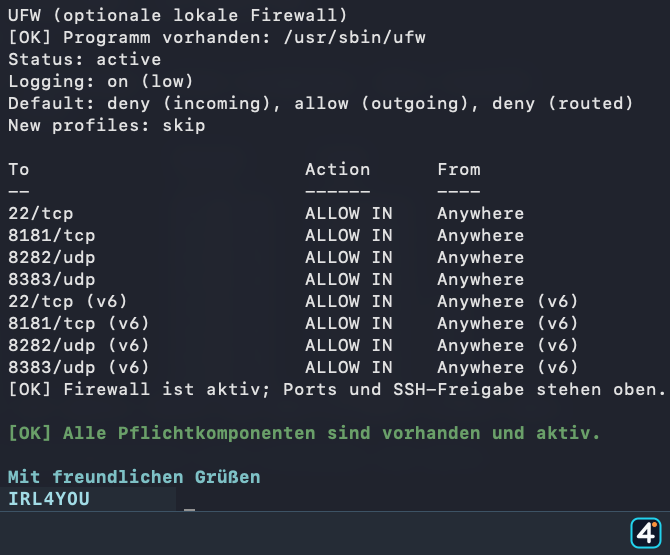
For a complete local firewall setup, answer j at the UFW question. Before enabling it, the installer shows the detected SSH port and lets you confirm or correct it. After that, 8181/TCP, 8282/UDP, and 8383/UDP are opened. If you answer n, you need a suitable firewall configuration from somewhere else.
After a successful installation, reboot the server yourself with reboot. Log in over SSH as root again and check Docker, the receiver, Fail2ban, and the firewall with:
/usr/local/sbin/irl4you-srtla-statusIf the package updates ask for a reboot first, restart the server and then run the same install command again. After that, set up the sender and stream ID and OBS. The sections below still describe the manual Ubuntu route and help with troubleshooting.
What the process looks like
The screenshots come from the practical tests with Ubuntu 26.04 and Debian 13. You can open them at full size.

1. Check requirements and architecture
You need a server with a public IP or matching router port forwarding, plus root access. The following manual installation steps use the Ubuntu package source. On Debian, use the tested automatic installation above. For the manual Ubuntu route, switch to a root shell first:
sudo -i#. Check every command before you paste it, and use this session only for the installation described here. That is why the following server commands need no extra sudo.Then check the architecture:
dpkg --print-architectureFor amd64, use the Compose file from this guide. For ARM64, change the image tag to v1.9-arm64.
Matching spot in the video: preparing the Ubuntu server, from 8:15
2. Install Docker Engine and Compose
The following manual commands use the Ubuntu repository. For Debian, use either the automatic installation above or the official Docker guide for Debian. Please do not add the Ubuntu repository on Debian.
Install the required packages
apt update && \
apt install ca-certificates curl -y
Add the Docker key
install -m 0755 -d /etc/apt/keyrings && \
curl -fsSL https://download.docker.com/linux/ubuntu/gpg -o /etc/apt/keyrings/docker.asc && \
chmod a+r /etc/apt/keyrings/docker.asc
Add the official Docker package source
tee /etc/apt/sources.list.d/docker.sources > /dev/null <<EOF
Types: deb
URIs: https://download.docker.com/linux/ubuntu
Suites: $(. /etc/os-release && echo "${UBUNTU_CODENAME:-$VERSION_CODENAME}")
Components: stable
Architectures: $(dpkg --print-architecture)
Signed-By: /etc/apt/keyrings/docker.asc
EOF
Install Docker and test it
apt update && \
apt install docker-ce docker-ce-cli containerd.io docker-buildx-plugin docker-compose-plugin -y && \
systemctl enable --now docker && \
docker run --rm hello-world
Source: Install Docker Engine on Ubuntu.
3. Create the SRTLA project and Compose file
Download the ready-made compose.yaml
Fetch the prepared Compose file straight from the IRL4YOU server into its intended location:
install -d -m 0755 /opt/srtla-receiver && \
curl -fsSL --retry 3 https://irl4you.de/downloads/compose-srtla.yaml -o /opt/srtla-receiver/compose.yaml && \
chown root:root /opt/srtla-receiver/compose.yaml && \
chmod 0644 /opt/srtla-receiver/compose.yaml
On amd64 the file works as is. If the architecture check printed arm64, open the file and replace the image tag v1.9-amd64 with v1.9-arm64:
nano /opt/srtla-receiver/compose.yamlservices:
srtla-receiver:
image: glowf1sh/srtla-receiver:v1.9-amd64
container_name: srtla-receiver
restart: always
environment:
NOALBS_STARTUP: "false"
LUSTATSBOT_STARTUP: "false"
SRTLA_REC_STARTUP: "true"
SLS_STARTUP: "true"
ports:
- "8181:8181/tcp"
- "8282:8282/udp"
- "8383:8383/udp"
logging:
driver: json-file
options:
max-size: "10m"
max-file: "3"NOALBS and the LiveU bot stay disabled for the first test. That lets you check the actual SRTLA link on its own.
4. Pull and start the container
cd /opt/srtla-receiver && \
docker compose pull && \
docker compose up -d && \
docker compose ps && \
docker compose logs --tail=100srtla-receiver container shows Up, and the logs show neither continuous restarts nor architecture errors.5. Ports and firewall
| Port | Protocol | Purpose |
|---|---|---|
| 8181 | TCP | Status page for the browser and NOALBS |
| 8282 | UDP | SRT input and SRT playback |
| 8383 | UDP | SRTLA input for bonding |
First, install UFW:
apt install ufw -yThen allow SSH first and the three required services after it. The manual example rule OpenSSH below fits the default port 22. If your server uses a different SSH port, use the automatic installation above: it detects the port actually in use and has you confirm it before UFW is switched on. Enable the firewall only after all the rules were created successfully:
ufw allow OpenSSH && \
ufw allow 8181/tcp && \
ufw allow 8282/udp && \
ufw allow 8383/udp && \
ufw --force enable && \
ufw status verbose&& runs the next step only if the previous one succeeded. The backslash at the end of a line continues the same chain on the next line. That keeps each command visible and still lets you copy them all together.ports: can bypass UFW rules and are reachable from outside by default. If you need to restrict them, do it additionally through your router, the provider firewall, or the Docker chain DOCKER-USER. See the official Docker documentation.For a server behind a router, the same ports must be forwarded to the Ubuntu server. Pay special attention to UDP: a TCP rule for 8282 or 8383 does not work.
Firewall and server ports in the video, from 17:48Oracle network rules in the video, from 19:47
6. Configure the sender and stream ID
Replace YOUR_LONG_KEY with a value that is hard to guess. In this setup the container has no publish key database of its own, so the stream name should not be trivial.
For example, generate a random 64-character value and store it like a password:
openssl rand -hex 32Plain SRT over one connection
Server:    srt://YOUR-SERVER-IP:8282
Stream-ID: publish/live/YOUR_LONG_KEY
SRTLA over several connections
Server:    srt://YOUR-SERVER-IP:8383
Stream-ID: publish/live/YOUR_LONG_KEY
According to the image documentation, some apps, including certain IRL Pro configurations, use an address in the format srtla://YOUR-SERVER-IP:8282 instead. What matters is the SRTLA mode your sender expects.
7. Receive the stream in OBS
Add a Media Source in OBS, turn off “Local File”, and enter this as the input:
srt://YOUR-SERVER-IP:8282?streamid=play/live/YOUR_LONG_KEY- Restart playback when source becomes active
- Show nothing when playback ends
- Close file when inactive
- Use hardware decoding when available
If OBS runs on the same machine as the SRTLA receiver, you can set the network buffer very small. With a remote server, one to three megabytes is a sensible starting point.
8. Check the status page and data flow
http://YOUR-SERVER-IP:8181/statsFirst check the container status and the listeners:
cd /opt/srtla-receiver && \
docker compose ps && \
ss -ltnup | grep -E ':8181|:8282|:8383'
If you need to, watch the live logs afterward. Exit the view with Ctrl+C:
cd /opt/srtla-receiver && \
docker compose logs -f --tail=100
If the sender is connected but the status page shows no publisher, check the stream ID, protocol, and UDP port. If the publisher is visible but OBS gets no picture, the playback ID must match play/live/YOUR_LONG_KEY exactly.
9. Prepare NOALBS for scene switching
The image includes NOALBS 2.11.2. It stays disabled for a first stable test. Later you can mount a valid configuration at /apps/noalbs/config.json and set NOALBS_STARTUP to true.
"streamServer": {
  "type": "SrtLiveServer",
  "statsUrl": "http://127.0.0.1:8181/stats",
  "publisher": "publish/live/YOUR_LONG_KEY"
}
The scene names for normal reception, low bitrate, and offline must match the names in OBS exactly. Since the bundled NOALBS version is older, set it up without the Twitch bot first.
10. Maintenance, restart, and troubleshooting
Show the status and the latest logs
cd /opt/srtla-receiver && \
docker compose ps && \
docker compose logs --tail=200
Restart the container
cd /opt/srtla-receiver && \
docker compose restart
Update the image and recreate the container
cd /opt/srtla-receiver && \
docker compose pull && \
docker compose up -d
Stop the container and keep the configuration
cd /opt/srtla-receiver && \
docker compose down
Leave the root shell
When installation or maintenance is done, end the root shell:
exitlatest carelessly. The fixed architecture tag keeps restores traceable. Check new versions separately first.Original project and details: glowf1sh/srtla-receiver on Docker Hub.
11. Video walkthrough: SRTLA server from A to Z
The practice video by Akinos01 “Akinos” (in German) shows the entire setup as it was back then: from the Oracle Cloud account and a free virtual Ubuntu machine, through SSH and PuTTY, to installing the SRTLA server and connecting BELABOX, OBS, and NOALBS.
Chapters in the video
- Overview and goal of the SRTLA server
- Setting up Oracle Cloud and a free server
- Creating a virtual Ubuntu machine
- SSH key for the server
- Setting up PuTTY and connecting
- Preparing the Ubuntu server
- Installing packages and Docker
- Setting up the SRTLA container
- Firewall and server ports
- Opening the Oracle network rules
- Connecting BELABOX to SRTLA
- Receiving the SRTLA stream in OBS
- Configuring NOALBS
- Function test and checking the status
Written alternative to the video: Use the automatic installation and read the steps for the sender and OBS reception right here on this page. The chapter markers above help you jump to specific parts.